
Many sellers underestimate the value of an Amazon product image. It’s the first thing a shopper notices, even pulling their attention before the product title, price, or description. A thoughtful image speaks to the buyer’s subconscious and describes your product’s value at a glance.
If an image is visually appealing, the product description will be secondary while the buyer’s trust level will be at an all-time high. Alongside the development of your brand, your product listing will shine brighter in a sea of competitors. This is the quickest way to improve your seller account’s rating. While the state of your product and listing will always be the decisive factor in your performance, an appealing image is essential to draw a buyer in. If your image is cursory or generic, your product or listing will be ignored.
This blog will present invaluable strategies to promote clicks, engagement, and sales from your Amazon listing through the simplification and optimization of your product image.
Why Are Product Images Important for Amazon Listings?
Images are one of your product’s most important marketing tools on Amazon. These are the first chance potential customers have to see and interact with your product. Images for your product listing shouldn’t be thought of as optional. They are a necessary part of your buy strategy.
Your potential customers likely aren’t skimming your product description to understand your product. They will most likely be looking at the images. Each image needs to serve a distinct purpose.
High-quality images will help customers:
- Put visual context to product description.
- Understand product dimensions and details.
- Evaluate your product’s value against similar products.
- Perceive your product as high-quality
- Feel secure in their purchase.
- Make a quick buying decision
Amazon Product Image Design Tips to Make Your Listing Look Professional, Attractive, And Conversion-Focused
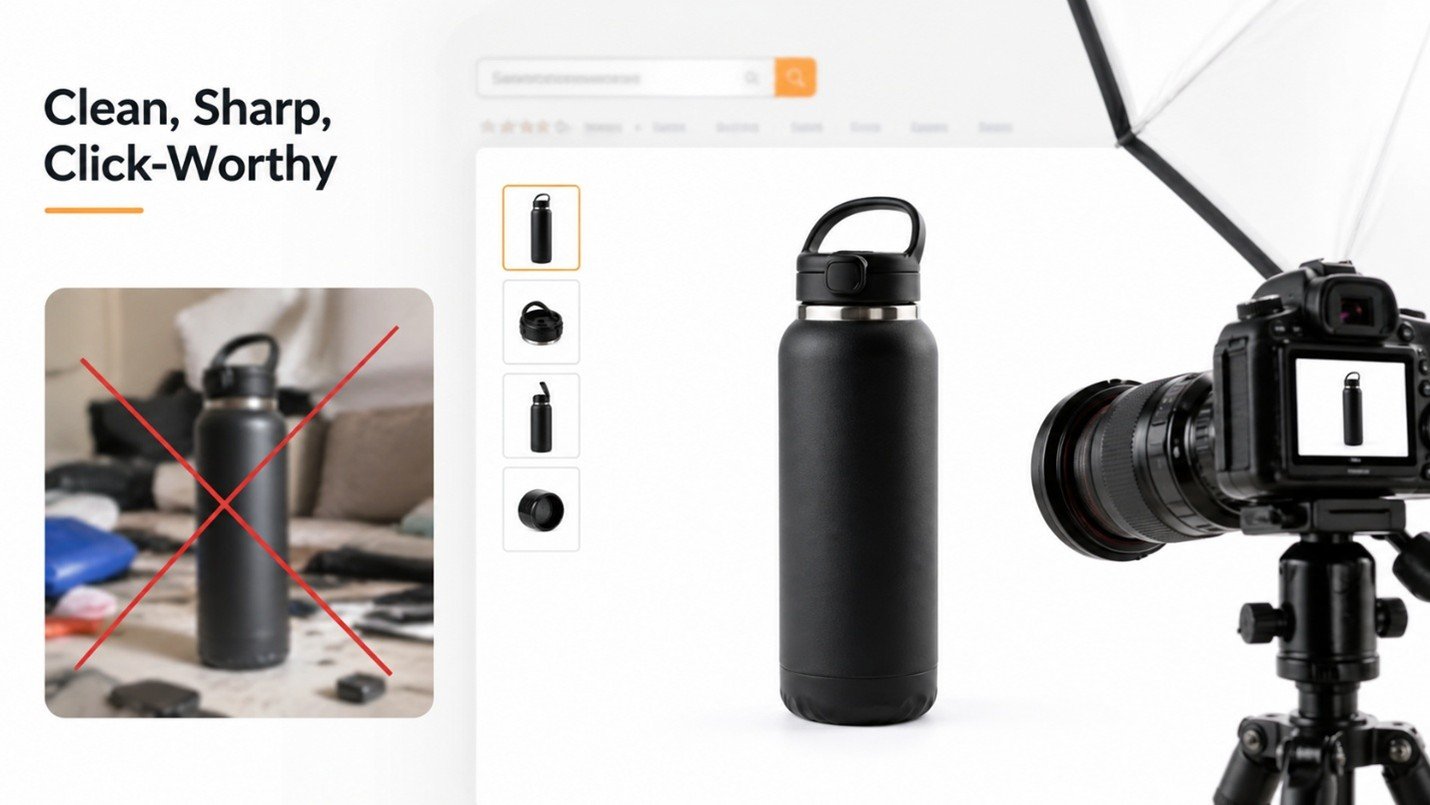
1. Make Your Main Image Clean, Sharp, and Click-Worthy
Amazon’s search results give the main photo of the product the opportunity to either make the sale or lose the consumer. The image should be clean, clear, and be taken professionally. Amazon users will lose the opportunity to click on the listing if the main picture is not weak.
The main image should be click-worthy and present the product clearly. Its background should be simple and the product should be clear.
Things to keep in mind:
- Use a pure white backdrop.
- Keep the image as large as possible.
- Use a clear image of the product (not a confusing background)
- Don’t overlay text or graphics.
- Use bright, natural lighting.
- Don’t make the image dark, blurry, or overdone.
2. Make the Product Look Premium Through Better Presentation
On Amazon, you can’t touch the product. The customer has to assess the quality by the photo. If the photo looks cheap, the product looks cheap. With the right lighting, angle, background, and editing, a product looks premium. The image builds trust and the product looks more valuable than competitors.
How to make images look premium?
- Use a high-quality product photo.
- Use natural and realistic colors.
- Don’t overlay shadows and use a clean background (with no dirt).
- Use a clear, and sharp image with balanced brightness.
- Use a high-quality image and keep the product centered.
- Use a product photo that looks polished.
3. Show the Product from Different Angles
Customers want to understand what they are buying before they place an order. If you only show one angle, they may still have doubts. Showing different angles gives buyers more confidence and reduces confusion. This makes the product feel more real. It also helps customers trust that you are showing everything clearly.
Useful angles to include
- Front view
- Back view
- Side view
- Top view
- Bottom view if needed
- Close-up details
- Product in hand
- Product with packaging or accessories
4. Use Lifestyle Images That Create Desire
Another effective approach is the use of lifestyle images. These images position a product as a piece of a customer’s day-to-day. The impact of this positioning is buyers become mentally acquainted with the product. Investing in lifestyle imagery is the right choice. Lifestyle imagery is situational imagery as opposed to product placement images. Situational imagery sells the benefit a product offers. They illustrate to potential buyers how the product improves the buyer’s living conditions (the product eases).
Examples :
- Kitchenware in a pristine contemporary kitchen
- Design accents in an aesthetically pleasing space
- Home Fitness Gear while in the scope of a workout
- Cosmetic items on a sophisticated makeup table
- Outdoor gear in an outdoor space
- Infant Gear in a Safe Home Arrangement
5. Highlight Benefits, Not Just Features
Customers don’t buy a product only because of its features. They buy it because it solves a problem, saves time, gives comfort, improves daily use, or makes life easier. That’s why your product image text should clearly show the real benefit behind each feature.
For example, instead of writing only “Strong Material” make it more meaningful by writing “Strong Material for Long-Lasting Use.” This tells the buyer that the product is durable and worth buying.
Below are simple features, but the improved lines clearly show the real benefit for the customer. This helps people quickly understand how the product will make their life easier, which increases trust and buying interest. Always focus on what the user gets, not just what the product has.
Simple Feature Text
Better Benefit-Focused Text
Strong Material
Strong Material for Long-Lasting Use
Large Capacity
Large Capacity to Store More Items Easily
Waterproof Design
Waterproof Design for Daily Protection
Easy Grip
Comfortable Grip for Better Control
Lightweight
Lightweight Design for Easy Carrying
Foldable Design
Foldable Design to Save More Space
Non-Slip Base
Non-Slip Base for Safer Use
Fast Charging
Fast Charging to Save Your Time
Note : This chart shows how to turn simple product features into clear, benefit-focused phrases that quickly explain why the product is useful. Instead of just telling what the product has, it highlights how it makes the user’s life easier, safer, or more convenient—helping customers decide faster.
6. Create Infographic Images That Explain Quickly
Maybe review sections on product pages mainly use images because most customers tend to ignore text and may be reviewing on a mobile device. Infographic images are some of the best answers for this problem. Infographics can visually explain many aspects of a product including features and benefits, size and materials, and how it is used and stored. Use a single image to explain a single piece of information.

Some Components of Infographic Images
- Core benefits of the product
- Quality of materials
- Core features
- Core size
- Core steps of use
- Core use and safety information
- Core complements
- Core Joys of the product
7. Show Size and Dimensions Clearly
One major challenge of online shopping is the misconceptions regarding the different sizes of the products offered. For instance, some customers may think the product is much larger or smaller. This notion can be corrected through a clear size image. The clearer the size image the lower the chances of returns and negative reviews. The buyers usually feel more confident with the offered product
What a good size image should show
- Product dimensions
- Measurement arrows
- Product beside a hand
- Product on a table, shelf, wall, or room setup
8. Show What Comes in the Box
For kits, bundles, and multi-piece products, outcome images that show all are important. For products with a storage bag, manuals, and or with bonus items, clearly show each one of the items, and be sure to label all items. This helps the product and its showcasing seem more valuable and complete.
A “what’s included” picture shows someone exactly what they can expect to receive.
This picture could show
- The main item
- Attachments
- Other pieces
- Instructions manual
- Instruction cables
- Use tools
- Carrying case
- Boxing
- Additional pieces included
9. Use Close-Up Images to Build Trust
Buyers appreciate the small details that show the product has quality. At times, the material, texture, or even the finishing touch can show the quality of the product. These images make the product and the images credible, showing the product is of high quality.
What should be considered for close-up images:
- Material
- Strong stitching
- Finishing touches
- Buttons
- Safety locks
- Surface quality
- Strong joints
- Non-slip surfaces
- Design elements
10. Make Every Image Mobile-Friendly
Most of your customers are shopping from their phones. What you have designed should be visible and of a quality that they can understand without having to zoom.
Mobile-Friendly design:
- Use Large, Readable Text
- Keep Text Short and to the Point
- Use Plain Fonts
- Use Proper Spacing
- No Excessive Icons
- Limit to One Key Message
- Keep Text and Image Background/SURFACE Color Contrast High
- Important: View the Image on Mobile Before Posting
11. Use Comparison Images to Beat Competitors
Comparison images are effective for showing your competitors what sets your product apart. Typical Comparison images are honest and uncluttered. Comparison images are effective for showing the value that improves purchases thinking. Fake claims are unneeded. Customers appreciate clear, factual, and tangible differences. An effective comparison image overwhelms competitors.
Comparison Ideas
- Ordinary vs. Your product
- Weak material vs. Strong material
- Small vs. Large capacity
- Messy result vs. Organized result
- Old design vs. Improved design
- Basic vs. Better comfort
- Use vs. Easy use
12. Build a Smart Image Flow That Guides the Buyer
Your product images should be uploaded in an image series with each image playing a different role. A customer should feel a high level of confidence during a purchase. Create product images that answer customer’s questions and leave no room for doubt. When images are in the correct order the customer will understand the product quicker and gain the confidence needed to make the purchase.
Image Number
Purpose of the Image
What It Should Show
Image 1
First Impression
Clean product image on a white background
Image 2
Main Selling Points
Top benefits that make the product useful
Image 3
Lifestyle Use
Product being used in a real situation
Image 4
Size & Dimensions
Measurements, scale, or capacity details
Image 5
Quality Details
Close-up of material, design, finish, or parts
Image 6
Package Details
What’s included in the box or set
Image 7
Comparison
Why this product is better or more practical
Image 8
Trust Builder
How to use, care instructions, guarantee, or extra proof
Summary: This table shows how utilizing a product image sequence ensures that each image serves a distinct function. This image sequence answers the most essential questions so that the buyer has a clear understanding and is confident about the product prior to purchase.
FINAL CONCLUSION:
The images that you provide on Amazon are not simply images that you have on your listing. They are incredibly powerful selling tools. A buyer measures a product’s overall quality, usefulness, size, and how much they can trust a listing all within a few seconds by simply looking at the images you have displayed. Therefore each product image needs to have a purpose. The main image has to catch a buyer’s attention. A lifestyle image has to create desire within the buyer to purchase. An infographic image has to provide an explanation of the benefits the buyer will gain from the purchase. Finally, a closed image has to remove any size related doubts a buyer may have.